
- Jinshiki Boss Fight Shindo Life Guide - August 10, 2022
- Shindo Life Bloodlines Guide - June 28, 2022
- Kaijin Shindo Life Guide - May 31, 2022
Kaijin is one of the many Clan Bloodlines available in Shindo Life. Kaijin relies on dealing ranged damage with a mode that uses a companion. I rarely use Kaijin, only because it does not deal enough damage to be effective in PVP, but it can be effective when used against bosses.
When I use Kaijin, I combine it with Xeno-Dokei and stack their ranged moves on bosses to deplete their health bar.
My Short Summary
Kaijin is a great bloodline for cycling a boss’s stun, but it lacks in damage with there being better alternatives.
What is Kaijin and how do you get it?
The bloodline Kaijin is based on the clan Sarutobi, and more specifically, it is based on Hiruzen Sarutobi, the Third Hokage.
To get Kaijin, it is only available through spins. To get to the spin tab, follow these steps:
- From the main menu, click the up arrow to reach “Edit.”
- When on the edit page, look for the “BLOODLINE” tab that is on your character.
- After clicking onto Bloodline, you need only to spin away to get Kaijin.
Kaijin has a 1 in 45 chance of being spun, so it should not be that difficult to get. It was one of my first bloodlines when I started playing Shindo Life.
I think the best way to guarantee yourself Kaijin, is to farm up around 80 spins, then spin. The reason I say this is that when you reach 80 spins, there is a full rarity spin, which eliminates the common bloodlines. I believe the most common bloodline you can spin on a full rarity is Scorch, which has a 1 in 12 chance.
The bonus of waiting to spin when you have 80 spins is that you have the chance of getting much rarer, like an Akuma, Jokei, etc.
How should you go about farming up to 80 spins? There are a few ways. I want to highlight the easiest way, which is through codes.
RELL Games, through their Twitter and YouTube, drop an absurd number of codes that give anywhere from 50 to 200 spins. Be sure to check back on their social pages for codes, so you don’t miss out on codes.
Just a little tip. They always drop a code after an update, so if you see “[UPDATE]” on the game page on ROBLOX, definitely check their YouTube channel, the codes will be there.
Kaijin’s Moves
Now, let’s talk about the moves that Kaijin has. Each of these moves uses ash to deal damage to your opponents. As I said before, Kaijin is best when used against bosses, so I will go into detail on how effective each move is in boss fights.
One more thing that I will mention is that Kaijin’s moves can be bound to either F, G, and H, or V, B, and N. This is useful if you have a complementary bloodline that can only be bound to V, B, and N.
Alright, let’s get to the move set:
- Ash Style: Burning Bullets
- Unlockable at level 75 and Chi stat level 380, costing 8,000 Ryo, shoots multiple bullets made of ash at your cursor. This is probably the second-best move that Kaijin has, only because it is fast, uses 15,000 Chi, and has a small cooldown of 16 seconds. Without any modes, it will deal right around 30,000 damage. If you pair it with Kaijin’s mode, it will deal 10,000 more damage. I use this move when a boss is in their stun phase, after using Burning Breath.

- Ash Style: Burning Fog
- To get Burning Fog, you need to be level 365, have a Chi level of 1,700, and spend 27,000 Ryo. Even though there is a 290-level gap between the two moves, there is not much difference in appearance or effectiveness between Burning Bullets and Burning Fog. The only difference that does exist is that Burning Fog creates a field that lasts for around eight seconds that deals damage to any opponents that are in it. It deals right around 40,000 damage without modes, and with Kaijin’s mode, deals an extra 10,000 damage. If you are giving up any moves that Kaijin has, Burning Fog is the worst of the bunch. It is only good if you have a lot of enemies in a crowded space. I can only recommend it for one scenario, and that is for the Jinshiki boss. When this boss goes into his stun phase, he spawns a group of Zetsu. If you use Burning Fog, it will damage all of them, but even then, it won’t kill them, so you will still have to deal with them before you can start hitting the boss.

- To get Burning Fog, you need to be level 365, have a Chi level of 1,700, and spend 27,000 Ryo. Even though there is a 290-level gap between the two moves, there is not much difference in appearance or effectiveness between Burning Bullets and Burning Fog. The only difference that does exist is that Burning Fog creates a field that lasts for around eight seconds that deals damage to any opponents that are in it. It deals right around 40,000 damage without modes, and with Kaijin’s mode, deals an extra 10,000 damage. If you are giving up any moves that Kaijin has, Burning Fog is the worst of the bunch. It is only good if you have a lot of enemies in a crowded space. I can only recommend it for one scenario, and that is for the Jinshiki boss. When this boss goes into his stun phase, he spawns a group of Zetsu. If you use Burning Fog, it will damage all of them, but even then, it won’t kill them, so you will still have to deal with them before you can start hitting the boss.
- Ash Style: Burning Breath
- Burning Breath is unlockable at level 475, Chi stat level 2,650, and costs 36,000 Ryo. This move is, in my opinion, the best move that Kaijin has. When you use Burning Breath, as the name suggests, breath out ash that sets your enemies on fire and also has mini-explosions that happen every time the move hits. Dealing around 50,000 damage without mode, and an extra 20,000 with mode, Burning Breath is a great move for the stun phase of the bosses. In my experience, this is the only move from Kaijin that I can rely on. I combine it with Xeno-Dokei’s C-Mode ability. With this combo, you will drain the boss’s health.
 Kaijin’s Z-Mode
 Kaijin’s Z-Mode
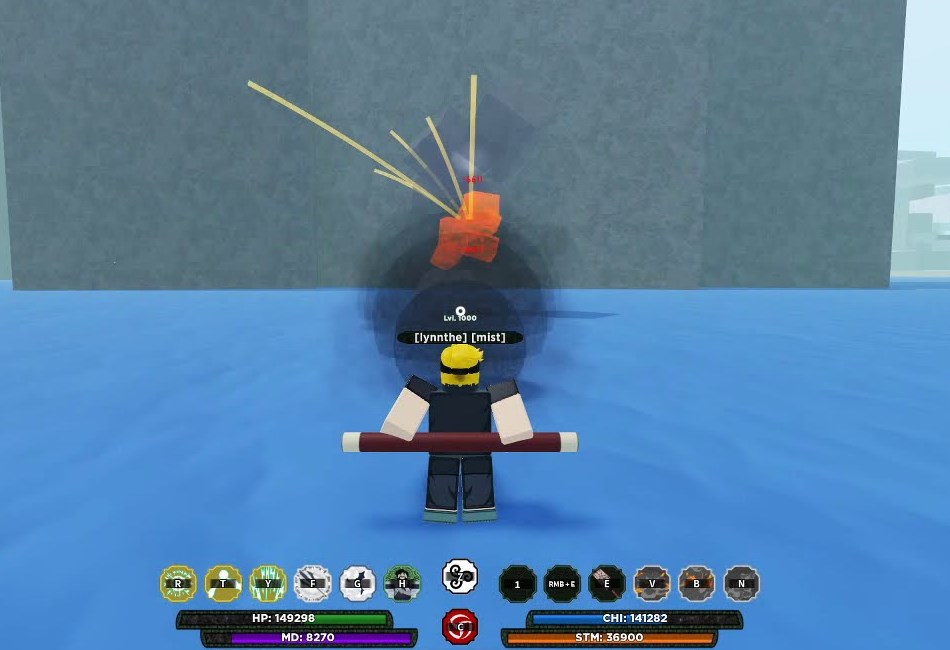
And now, the Mode. To equip Kaijin’s mode, you need to be bloodline level 500. When equipped and activated, you will get a rod that sits on your back. If you have watched Naruto, you will recognize this rod from Hiruzen Sarutobi’s fight with Orochimaru. Unfortunately, Kaijin’s mode drains 40 MD per second. That said, Kaijin’s mode is unique and has a couple of benefits that come along with it:

- When you are in Kaijin’s mode, your ninja tool is replaced with that rod. This means every time you attack with your left mouse button, you will use the rod as your weapon
- Kaijin is one of the few bloodlines in Shindo Life that has a companion that attacks for you.
- Even though Kaijin is a bloodline, its mode is bound to Z rather than C, meaning that you can combine the mode with another bloodline’s mode. When I use Kaijin, I use its mode and Xeno Dokei’s mode as well.
Kaijin’s mode ability can be used by pressing Z on your keyboard. This is one of the benefits of using Kaijin. It does not require you to press the right mouse button as well as the key. Here are the abilities that Kaijin has in mode:
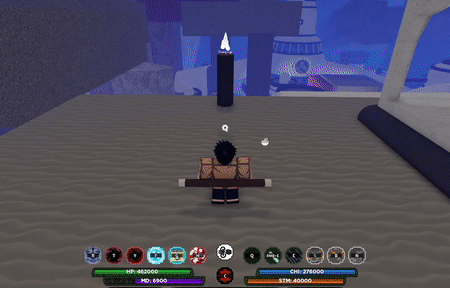
- Z-ability
- When you press Z, your rod will disappear from your back and will summon a giant monkey. This monkey resembles the monkey king, Enma, from Naruto. When summoned, the monkey king will attack the nearest enemy with M1 combos and taijutsu for 20 seconds. At any time, you can click Z again and it will de-summon the monkey king. The greatest part about this ability is that it only uses 15,000 Chi and has a very short three-second cooldown. If you leave the monkey king out for the entire 20 seconds, that cooldown is negated, and you can re-summon him after he disappears.

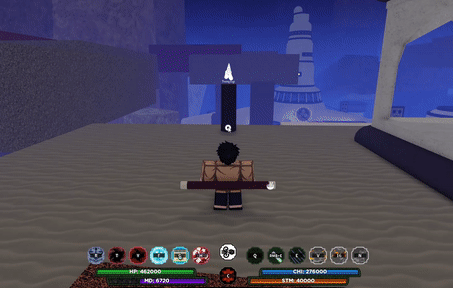
- Q-ability
- While you have the rod on your back, you can use Kaijin’s Q-ability. When you press Q, the rod will extend a very long length, dealing damage to anything it hits. On a single target, it will hit them three times, dealing around 60,000 damage. When in use, you can move around your camera and character to hit other targets. This ability uses right around 6,500 stamina and has an 18-second cooldown.

How should you use Kaijin in Boss Fights?
So, now that you know the moves and abilities of Kaijin, let’s talk about how you should use it in boss fights. Kaijin is only good in boss fights when the boss is in its stun phase, so you have to go through each cycle to get that phase of any boss. The best way to get any boss to that phase is by using the monkey king. While the monkey king is active, bosses will target him, and use their abilities on them, meaning the stunning cycle will eventually happen. I will highlight all the bosses that you can fight, starting with Deva-Rengoku, the first boss, and, in my opinion, the easiest.
But first, I want to mention that after you get each boss to enter their stun phase, you can hit them with this series of moves for the maximum amount of damage. Keep in mind this is in the situation where you only have Kaijin.
- Ash Style: Burning Breath
- Ash Style: Burning Bullets
After using these three moves, which are the primary damage-dealing abilities, use any ninjutsu you have. I generally will use the Satori Inferno Bomb Rush and Bankai Inferno Bomb Toss. By the time you use all of these moves, the boss will start attacking you again, restarting the cycle to reach his stun phase.
Now, to the bosses:
Deva-Rengoku
- This boss has four moves that he will use before entering his stun phase. They can come in any order, but I have found it has happened in the following sequence:
- Rengoku Style: Gravity Push
- Rengoku Style: Dark Matter Tensei
- Almighty Engage
- Rengoku: Meteor Burst
- Now, there is a second phase where Deva will destroy you if you’re not careful. This phase starts when he reaches below half hp. In this mode, he gains two new moves to the cycle:
- A barrage version of Rengoku: Meteor Burst. You really need to be careful with this move. It can one-shot you. Use the monkey king or another companion to bait out this move, it comes after Almighty Engage.
-
- A massive version of Rengoku: Heavenly Throttle. This move is the last move that Deva will do before being stunned, so just wait it out. It does not do a ton of damage, so I suggest after he uses the barrage Meteor Burst, just go in and get Deva to use this move.
Forged-Rengoku

- This boss is probably the second hardest boss to beat, as he stacks a ton of damage on you if you get hit. Don’t let that stray you away from attempting to beat him, because if you play your cards right, you can beat him easily. The Forged boss relies on genjutsu to stun you so he can start combo-ing you. What I suggest you do is stay on the beach and tank the genjutsu. He will get stuck on an invisible wall, and unless he uses Ember Entry, and then he will jump up to the beach. Even though he can do that, all you have to do is back up and he will teleport back to his spawn. Here is the ability cycle that Forged will go through:
- Reality Style: Control
- Forged-Rengoku C-ability
- Rengoku Style: Dimension Trap
- Rengoku Style: Gezo Soul
- Again, there is a second phase, so you have to be careful. In this second phase, Forged will summon the Gezo Mado, which is easily the most annoying enemy I’ve ever fought. To deal with Gezo, you need to lure him far away from Forged and then reset. This will get him stuck outside of his detection range, and you will be able to fight forged free from the Gezo Mado. Now, Forged gains one new move:
- Forged-Rengoku Q ability. This move is a ranged genjutsu. It will shoot out Forged Shurikens at you and will enter you into a genjutsu.
The best way to beat him is to wait him out on the beach. Take the hits, but whatever you do, do not get hit by his melee attacks; they do an absurd amount of damage.
Shindai Rengoku
- Shindai is another one of those bosses that is just annoying. I think the worst part about this boss is he spawns samurai spirits in both stages that do way too much damage. It is also really hard to get the drops that Shindai gives, with the bloodline drop having a rarity of 1 in 25. As I am writing this, I still do not have the bloodline, so good luck to you. With all this said, if you still want to farm Shindai, here are his moves before he enters stun. All of these moves are from Shindai-Akuma and Shindai-Rengoku.
- Copy Style: Samurai Sekiro
- Shindai-Rengoku E ability
- Rengoku Style: Under the Sun
- Copy Style: Sunflower Desolation
- Unfortunately, this is not even the hardest part. When Shindai reaches half hp, he enters his second stage. At this stage, he will replace Samurai Sekiro and gain a couple of moves.
- He will spawn a generation one Tyn Tailed Spirit
- Rengoku Style: Great Majestic Blaze
- Rengoku Style: Tailed Spirit Counter
This boss will take you around 20 to 30 minutes to beat each time, so honestly, just stay away from Shindai. It is not worth it.
Kagoku
- Oh, Kagoku… This boss is probably the least known, and the least attempted. I say this because it doesn’t really drop anything useful. That being said, if you have an unwavering desire to get the Ash Bone Staff, or perhaps the Kagoku Rabbit Mode, then, by all means, attempt to beat this boss. Just be prepared to die quite a few times; she does too much damage and stuns a lot. I’ll stop bickering now. Here are her moves, in order, that lead to stun.
-
- Goku Style: Ash Bone Portal Barrage
- Goku Style: Universal Bone Blade
- Goku Style: Portal Bone Break
- Kagoku’s first C ability
- Ash Bone Staff Q ability
- This boss changes three times based on her health. Because the boss uses the bloodline Kagoku, she will also use every stage:
- At half hp, she will transform into the second stage, which uses lava.
- When she has one-quarter of her hp left, she goes to the third stage, which uses ice.
- Finally, as a last resort, and just to be extra annoying, she will enter the fourth stage when there is only a tiny bit of hp left.
If you want my advice, go fight another boss. Actually, look ahead a little to the next boss, Jinshiki. He drops a lot better loot than Kagoku.
Jinshiki
- Finally, a boss that is actually rewarding… Jinshiki is a really hard boss to beat, but he drops so much loot. When this boss first came out in April 2022, I hopped on right away and got almost every drop within a couple of attempts. Unfortunately, nothing can be perfect without some flaws, and I hate to break the news to you. On release, the boss dropped tailed spirits as well as the mode and bloodline mode, but now, they RELL removed that benefit. Tragic, I know. That being said, the mode drop, Jinshiki God Awakening, is an incredibly powerful mode. Now, on to the moves that lead to the stun.
-
- Shiki Style: Box Expansion
- Shiki Style: Vigor Rod
- Shiki Style: Counter Combo
- Jinshiki God Awakening Q ability
- And now the second stage. Jinshiki will gain two new abilities.
-
- Jinshiki God Awakening E ability
- Jinshiki God Awakening charged Z ability
- In every stun phase, Jinshiki will spawn a tailed beast to defend him.
The trick for this boss is to use companions to bait out the moves to get the cycle going, making Kaijin perfect for this boss. That being said, Jinshiki has a lot of health, so Kaijin alone is not going to be enough.
That wraps up every boss and their moves, so now, let’s address the big question: Is Kaijin effective for boss fights? Yes.
The mode ability, that being the monkey king, is perfect for cycling the boss, and unlike actual companions who have a 30-second cooldown after dying, Kaijin only has a three-second cooldown.
I have to say this; you have to use a more powerful bloodline with it, and now, I will go into what bloodlines you should be using with Kaijin.
What are the Best Bloodlines to use with Kaijin in Boss Fights?
Alright, the best bloodlines for Kaijin. I’m only going to mention one because, honestly, there is only one that can be considered the best bloodline to farm bosses with Kaijin.
- Xeno-Dokei
- I think Xeno-Dokei takes the number one spot for compatibility with Kaijin. This is because Xeno-Dokei’s C ability is very similar to Burning Breath. To be effective with Xeno-Dokei and Kaijin, you need to get any boss to its stun phase. As I have already gone over how to do so, I won’t bore you with the process again. When the boss is in stun, follow this combo.
- Xeno-Dokei stage 1 or 2 C ability
- Xeno-Dokei stage 1 or 2 Q ability
- Dokei Style: Blood Rain
- I think Xeno-Dokei takes the number one spot for compatibility with Kaijin. This is because Xeno-Dokei’s C ability is very similar to Burning Breath. To be effective with Xeno-Dokei and Kaijin, you need to get any boss to its stun phase. As I have already gone over how to do so, I won’t bore you with the process again. When the boss is in stun, follow this combo.
Now, I know what you’re thinking, where is Kaijin? I need to be brutally honest here, it does not do enough damage to justify replacing any of Xeno-Dokei’s moves. Just trust me here.
FAQs
Question: What are the faster ways I can farm bosses?
Answer: There is a big argument about what is the fastest way to farm bosses is. There are two methods, the Xeno-Dokei stun cycle, and the Shado Apollo technique. Personally, I think the Shado Apollo technique is faster, but it does require more precision. For this technique, you only need two moves:
Shado mode C ability
Iron Style: Iron Fist
The reason you need only these two is that they are wave attacks. The neat thing about these wave attacks is that, if done right, they will deal around 700,000 damage to the boss. I’ve even gotten it to 800,000 once before. It just takes a ton of precision and correct timing. Let me explain. You need to get the boss, who is hopefully at their spawn, to run at you. As the boss runs at you, use either of those moves in their direction. As the boss runs through that wave, it will deal damage constantly until the wave disappears. I’ll include an example that shows you the power of this move, showcased on Jinshiki.
Question: What are the better alternatives to Kaijin?
Answer: Xeno-Dokei plus a companion. If you are sticking to bosses, use Xeno Dokei. The similarity between the Xeno-Dokei C ability and Burning Breath makes Xeno-Dokei a great replacement for Kaijin. That being said, to make up for the loss of the monkey king, you probably should equip another companion to bait out those boss moves. Oh, and make sure that companion is high level so that he does not instantly die to one of the boss’ moves. I’ll mention quickly that the only way to farm companion exp is through green scroll quests.
Question: Which boss drops the best loot?
Answer: The Jinshiki boss gives one of the best modes in the game, Jinshiki God Awakening, and in my opinion, he is the least annoying. I guess Deva is also good for loot, being that it is so easy, but the bloodline, Deva-Rengoku, is a mid-tier bloodline. My experience has told me that Jinshiki has been worth my time, while all the others have been, meh…
Conclusion: Is Kaijin a good Bloodline to Use?
I want to finish with this. Kaijin is probably only effective at getting a boss to stun, as harsh as that is.
If you ended up getting Kaijin when spinning, then all is not lost. Kaijin is good, but not strong enough to carry a boss fight. You need a complementary bloodline that packs a punch.
Recommended Reads:
- Bloxburg Color Schemes
- Who Was lizzy_winkle? – Remembering Royale High’s Legendary Developer
- Royale High Outfits Guide: How to Get New Royale High Clothing Items
- Top Roblox Accessories: Royal Crown, Usagi Mask And More – Explained
- Dragon Fruit Blox Fruits Guide: Unleashing the Power of the Dragon in Blox Fruits